


Table of contents


No headings in the article.
Welcome to the second part of my Vagrant Guide. In the first part we looked at initiating a vagrant file and editing it to our liking in order to allow the machine to have the perquisites that the desired programs might need.
In this one we'd learn how to provision it and what are the basic problems you might face with it. So lets move towards our next command.
Vagrant box list
This command will list all the boxes you might have downloaded on your machine till now. for example, everytime you provision a VM using vagrant it downloads the said box for the first time and then uses the same box until there is an update for the same box available on the cloud. As a result it is much faster for you to set up the VMs once you have 1 of the vagrant box image downloaded.
With this command you will be able to see which boxes have you you worked on in the past and are ready to be use with your machines now.
You can find these boxes downloaded at C:\Users\USER-NAME.vagrant.d\boxes.
vagrant box add <name> <box path/HTTP URI>
Use this command to save the box without provisioning the VM. With this command you are downloading the box at the predefined location and giving it a name as per your liking. Here, name would be the name of the box and path or URL will be the URL you get from Vagrant cloud website i.e https://app.vagrantup.com/boxes/search.
vagrant box remove <name>
With this command you can remove the existing vagrant boxes on your local computer for any reason of your liking.
vagrant box outdated
Searches for an update to your existing box saved on your local computer. You can name a box if you need to, and receive updates for that one box in particular.
Up until here we have learnt to manipulate the vagrant boxes and set up these boxes according to our liking. Now we will concentrate on the VM provisioned by these boxes.
Vagrant UP / vagrant up --provision | tee provision.log
This command starts the provisioning process according to the details mentioned in the Vagrant file of your choice. Keep in mind, to start the process you need to be in the same folder as the vagrant file is or else it would not start provisioning as there is no step by step instruction that it can find. You can use the second command to add a log file and add the output to the file.
vagrant status/ vagrant global-status
Lets you know the status of the machine running in your current directory. If you wish to know the status of all the machines regardless of the directory you can use vagrant global-status.
Vagrant Halt
This command lets you gracefully shutdown all the machines at once.
Vagrant reload/ Vagrant Provision
Vagrant reload restarts the VM in question and in case if the provisioning instructions are skipped for some reason(Maybe it was applied the last time but got an error for some reason), you can use Vagrant provision and force the re-provisioning of the VM.
Vagrant SSH
Most important command of them all to understand, this command uses a Secure Shell connection and provides you a command line interface to access machine. Keep in mind that this is a secure connection and would require a password for the same. By default, it uses a secure key to encrypt the connection and log in, but in case for some reason it asks you for the password, the default password is "vagrant".
Vagrant destroy
Using this command you can destroy all your provisioned VMs. This will remove the VM for whichever folder you are in.
Vagrant suspend/ Vagrant resume
Suspends and resumes the state of your VMs respectively.
vagrant reload --provision
Restarts the VM and forcibly re-provisions the VMs.
Let us know talk about a few error statements that you might get when trying to use the vagrant tool.
Connection Issues:
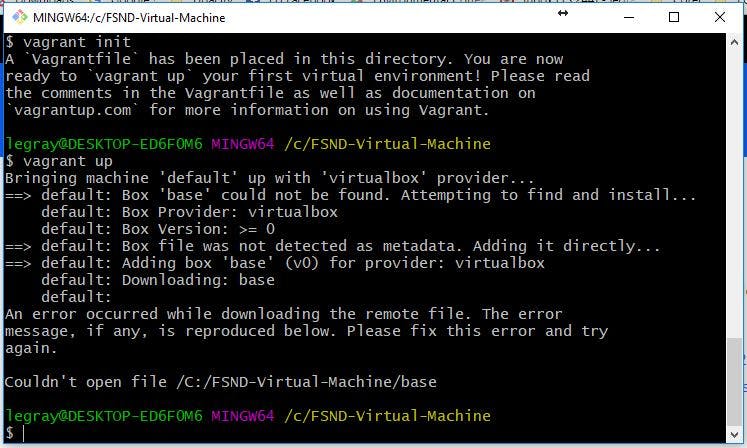 This means you have not provided a base box for the vagrant file to set up and just ran vagrant init command. Since, you have not mentioned the name of the box with the init command it creates a blank vagrant file with a placeholder in place of the vagrant box link. As a result it fails to load up the box. Instead use it like this.
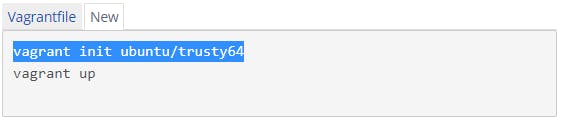
This could also come up in case if your provided box is unreachable for some reason as it is at a remote repository. In that case, just change the box to another similar one and it should work fine.
Another issue that can pop-up is the inability to ping one machine from another. Make sure you have added the IP addresses for each machine into the other machine's host file usually found at /etc/hosts.